
How to Deploy Server-Side Google Tag Manager on AWS Fargate
A complete guide to running sGTM outside of Google Cloud , with a production-ready CloudFormation template.
Google’s server-side Tag Manager (sGTM) is a powerful tool for first-party data collection, improved site performance, and better data governance. But Google’s official documentation only covers deployment on Google Cloud Run. If your organization runs on AWS, you’ve been left to figure it out yourself.
At Wheelhouse DMG, we’ve been running sGTM on AWS Fargate in production since October 2025. This post walks you through exactly how we set it up, and includes a CloudFormation template you can deploy in your own AWS account.
Why Run sGTM on AWS?
Google Cloud Run works fine, but there are real reasons to host sGTM on AWS instead:
- Existing AWS footprint. If your team already manages infrastructure in AWS, adding a GCP project just for sGTM creates operational overhead — separate billing, IAM, monitoring, and on-call procedures.
- Data sovereignty. Running on AWS lets you operate sGTM as an appliance you own rather than a service you route data through. Your visitor data is processed entirely on infrastructure you control, and Google operates no part of the data path. For organizations that would rather not entrust their data pipeline to Google, that independence is the whole point.
- Data residency. Deploy in whichever AWS region meets your compliance requirements.
- Privacy compliance. For regulated industries like healthcare, this architecture keeps your tag server inside HIPAA-eligible AWS infrastructure you control, and gives you a server-side control point to filter data before it reaches any downstream vendor. It doesn’t require a BAA with Google, and if your compliance program needs one for the infrastructure, AWS will sign a BAA at no cost.
- Cost predictability. Fargate pricing is straightforward: you pay for the vCPU and memory your tasks use. No surprises.
- Network control. A static outbound IP (via NAT Gateway) makes it easy to allowlist your sGTM with third-party vendors.
Architecture Overview
Here’s what we’re building:
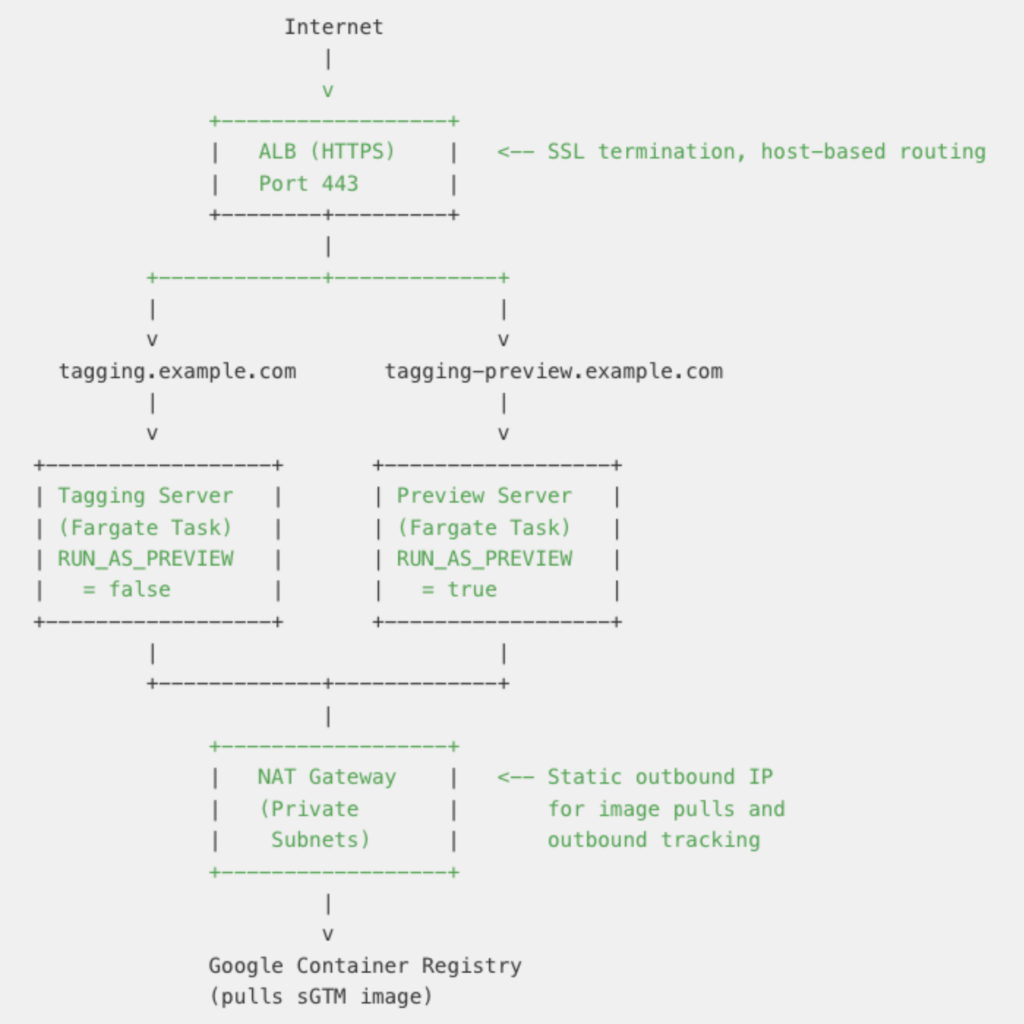
Key design decisions:
- Two separate Fargate services on one ECS cluster — a tagging server for production traffic and a preview server for GTM’s debug/preview mode.
- Private subnets for ECS tasks — no public IPs. All outbound traffic goes through a NAT Gateway with a static IP.
- Host-based routing on the ALB —
tagging.example.comroutes to the tagging server,tagging-preview.example.comroutes to the preview server. - Health checks on
/healthz— the sGTM container exposes this endpoint natively.
Prerequisites
Before you begin, you’ll need:
- An AWS account with permissions to create VPCs, ECS clusters, ALBs, IAM roles, and CloudFormation stacks.
- Two domain names (or subdomains) you control — one for the tagging server, one for the preview server. For example:
tagging.example.comandtagging-preview.example.com. - A GTM server container provisioned in Google Tag Manager. You’ll need the Container Config string (a base64-encoded value).
- AWS CLI installed and configured.
Step 1: Get Your sGTM Container Config
- Go to tagmanager.google.com.
- Create or open a Server container.
- Go to Admin > Container Settings.
- Under Container Config, you’ll see a base64-encoded string. Copy it. It looks something like:
aWQ9R1RNLVhYWFhYWCZlbnY9MSZhdXRoPXh4eHh4eHh4eHh4eHh4eHh4eA==
This string encodes your container ID, environment, and authentication token. Keep it confidential.
Step 2: Request ACM Certificates
You need SSL certificates for both domains. AWS Certificate Manager provides free certificates.
# Request a certificate for your tagging domain
aws acm request-certificate \
  --domain-name tagging.example.com \
  --validation-method DNS \
  --region us-west-2

# Request a certificate for your preview domain
aws acm request-certificate \
  --domain-name tagging-preview.example.com \
  --validation-method DNS \
  --region us-west-2
Important: Certificates must be in the same region as your ALB. Complete the DNS validation by adding the CNAME records ACM provides to your DNS.
Alternatively, request a single wildcard certificate for *.example.com to cover both.
Step 3: Deploy the CloudFormation Stack
We’ve provided a complete CloudFormation template (sgtm_template_public.yaml) that creates everything: VPC, subnets, NAT gateway, ALB, ECS cluster, task definitions, and services.
aws cloudformation create-stack \
  --stack-name sgtm-stack \
  --template-body file://sgtm_template_public.yaml \
  --capabilities CAPABILITY_NAMED_IAM \
  --parameters \
    ParameterKey=ContainerConfig,ParameterValue='YOUR_BASE64_CONTAINER_CONFIG' \
    ParameterKey=TaggingDomain,ParameterValue='tagging.example.com' \
    ParameterKey=PreviewDomain,ParameterValue='tagging-preview.example.com' \
    ParameterKey=TaggingCertificateArn,ParameterValue='arn:aws:acm:us-west-2:123456789:certificate/xxxxx' \
    ParameterKey=PreviewCertificateArn,ParameterValue='arn:aws:acm:us-west-2:123456789:certificate/yyyyy' \
  --region us-west-2
The stack takes about 5 minutes to create. Monitor progress:
aws cloudformation describe-stacks \
  --stack-name sgtm-stack \
  --query 'Stacks[0].StackStatus' \
  --region us-west-2
Once complete, get the ALB DNS name from the stack outputs:
aws cloudformation describe-stacks \
  --stack-name sgtm-stack \
  --query 'Stacks[0].Outputs' \
  --region us-west-2
Step 4: Set Up DNS
Create DNS records pointing your domains to the ALB. If you’re using Route53:
# Get the ALB DNS name and hosted zone ID from stack outputs
ALB_DNS="your-alb-dns-name.us-west-2.elb.amazonaws.com"
ALB_ZONE_ID="Z1H1FL5HABSF5"  # From stack output ALBHostedZoneId
HOSTED_ZONE_ID="your-route53-hosted-zone-id"

# Create alias records for both domains
aws route53 change-resource-record-sets \
  --hosted-zone-id $HOSTED_ZONE_ID \
  --change-batch '{
    "Changes": [
      {
        "Action": "CREATE",
        "ResourceRecordSet": {
          "Name": "tagging.example.com",
          "Type": "A",
          "AliasTarget": {
            "HostedZoneId": "'$ALB_ZONE_ID'",
            "DNSName": "'$ALB_DNS'",
            "EvaluateTargetHealth": false
          }
        }
      },
      {
        "Action": "CREATE",
        "ResourceRecordSet": {
          "Name": "tagging-preview.example.com",
          "Type": "A",
          "AliasTarget": {
            "HostedZoneId": "'$ALB_ZONE_ID'",
            "DNSName": "'$ALB_DNS'",
            "EvaluateTargetHealth": false
          }
        }
      }
    ]
  }'
If your DNS is hosted elsewhere, create CNAME records pointing both domains to the ALB DNS name.
Step 5: Verify Health and Test
Check that both services are healthy:
# Check target health for both target groups
aws elbv2 describe-target-health \
  --target-group-arn $(aws cloudformation describe-stack-resources \
    --stack-name sgtm-stack \
    --logical-resource-id TaggingTargetGroup \
    --query 'StackResources[0].PhysicalResourceId' \
    --output text --region us-west-2) \
  --region us-west-2

aws elbv2 describe-target-health \
  --target-group-arn $(aws cloudformation describe-stack-resources \
    --stack-name sgtm-stack \
    --logical-resource-id PreviewTargetGroup \
    --query 'StackResources[0].PhysicalResourceId' \
    --output text --region us-west-2) \
  --region us-west-2
Both should show "State": "healthy". You can also hit the health endpoint directly:
curl -s https://tagging.example.com/healthz
# Should return 200 OK
Step 6: Configure GTM to Use Your Server
- In Google Tag Manager, open your Server container.
- Go to Admin > Container Settings.
- Set the Server Container URL to
https://tagging.example.com. - The preview server URL is configured automatically via the
PREVIEW_SERVER_URLenvironment variable in the tagging task definition. - Test using GTM’s Preview mode — it should connect through your preview server.
Understanding the Dual-Service Architecture
sGTM uses two modes controlled by the RUN_AS_PREVIEW_SERVER environment variable:
| Mode | Env Var Value | Purpose |
| Tagging Server | false | Handles real production traffic — processes incoming tag requests and forwards data to configured destinations (GA4, Google Ads, etc.) |
| Preview Server | true | Powers GTM’s preview/debug mode — lets you inspect requests and test tag configurations before they go live |
The tagging server also needs PREVIEW_SERVER_URL set to your preview server’s URL so that GTM’s debug mode works correctly when initiated from the tagging server.
We run these as separate ECS services on the same cluster. This means:
- They scale independently
- A crash in the preview server doesn’t affect production tracking
- You can use different task sizes if preview needs fewer resources
The ALB uses host-based routing rules to direct traffic to the correct service based on the domain in the request.
Security Design
This architecture follows AWS security best practices:
- ECS tasks run in private subnets with no public IP addresses. They are not directly reachable from the internet.
- The ALB is the only internet-facing component, placed in public subnets across two availability zones.
- Security groups enforce least privilege: the ECS security group only allows inbound traffic on port 8080 from the ALB’s security group. No direct internet access to the containers.
- NAT Gateway provides outbound-only internet access for the Fargate tasks, needed for pulling the container image from Google Container Registry and sending data to tracking endpoints.
- The NAT Gateway’s Elastic IP is static, which means you can provide it to third-party vendors who require IP allowlisting.
- SSL termination happens at the ALB using ACM certificates that auto-renew.
Cost Estimate
Running sGTM on Fargate with the default configuration (2 tasks at 0.25 vCPU / 1 GB each) costs approximately $80-85/month in us-west-2:
| Component | Monthly Cost |
| Fargate Compute (2 tasks, 24/7) | ~$22 |
| NAT Gateway (hourly + data) | ~$34-38 |
| Application Load Balancer (hourly + LCU) | ~$18-22 |
| Public IPv4 Address (NAT EIP) | ~$3.72 |
| Route53 Queries | ~$1 |
| CloudWatch Logs | ~$1 |
| ACM Certificates | $0 (free) |
| Total | ~$80-87 |
The NAT Gateway is the largest single cost (~40%). If you’re already running a NAT Gateway in an existing VPC, you can deploy the sGTM tasks into that VPC instead and skip creating a new one.
For comparison, Google Cloud Run charges $0 for the free tier (up to 2 million requests/month) and then per-request + CPU/memory after that. For low-traffic sites, Cloud Run is cheaper. For high-traffic sites with steady load, Fargate’s predictable pricing can be more cost-effective.
Troubleshooting
Tasks Failing to Start
Check the ECS service events and CloudWatch logs:
# Check service events
aws ecs describe-services \
  --cluster sgtm-cluster \
  --services sgtm-tagging-service \
  --query 'services[0].events[:5]' \
  --region us-west-2

# Check container logs
aws logs tail sgtm-log-group --since 1h --region us-west-2
Image Pull Failures
The most common issue. The sGTM image lives on Google Container Registry (gcr.io), and your Fargate tasks need outbound internet access to pull it. Verify:
- NAT Gateway is configured and the private subnet route table has a
0.0.0.0/0route to it. - Security groups allow outbound traffic — by default, AWS security groups allow all outbound, but verify nothing is blocking port 443 outbound.
- The image URI is correct:
gcr.io/cloud-tagging-10302018/gtm-cloud-image:stable
Health Check Failures
If targets show as unhealthy:
- Confirm the health check path is
/healthz(not/healthor/). - Ensure the health check port matches your container port (default 8080).
- Check that the
CONTAINER_CONFIGenvironment variable is correct — an invalid config will prevent the container from starting properly. - Allow 2+ minutes after deployment for the health check grace period to expire.
CORS Issues
If you see CORS errors in the browser console, you may need to configure CORS headers. This is typically handled at the sGTM container level through tag configuration in GTM, not at the ALB level.
What’s Next
This setup gets you a working sGTM deployment on AWS. Here are improvements you might consider:
- Auto-scaling: Add Application Auto Scaling to handle traffic spikes. Scale on CPU utilization or ALB request count.
- ECR mirror: Pull the Google image once and push it to your own ECR repository. This removes the runtime dependency on Google Container Registry and speeds up deployments.
- Secrets Manager: Move
CONTAINER_CONFIGinto AWS Secrets Manager instead of passing it as a plain environment variable. - Multi-region: Deploy a second stack in another region for disaster recovery, fronted by Route53 health checks and failover routing.
- WAF: Add AWS WAF in front of the ALB to filter malicious requests before they reach your sGTM.
This architecture has been running in production at Wheelhouse DMG since October 2025, processing tracking requests for our clients’ websites. The CloudFormation template included with this post is the same one powering our deployment.
If you have questions or want help setting this up for your organization, reach out to our team.