Using Azure Key Vault in your Applications
Introduction:
When developing cloud applications, it can be important to abstract your keys and secrets out of your environment for security. Failing to do so can result in compromised security issues escalating to other environments and services. In addition this can reduce the steps required for environmental setup, as well as provide a single point of management for multiple environments.
When using Azure Key Vault for this purpose in an “Azure Active Directory App” we built, we found that the documentation for using Key Vault was lacking at the time of writing this article. Apps must be registered with Active Directory in Azure if you’d like to Authenticate and Authorize with Azure Active Directory.
This will be a quick overview of the process we used to set up Azure Key Vault for in our application. We will be including code examples from Python 3.6 and Node.
Dependencies:
- The Node version requires the use of the library ‘azure-keyvault’ (https://www.npmjs.com/package/azure-keyvault)
- The Python version requires the use of the library ‘azure’ (https://pypi.org/project/azure/)
- This assumes you have an Azure Portal account, and an Azure Active Directory application set up, as well as the required permissions for your account and subscription.
The following documentation provided by Microsoft should assist in the previously mentioned setup if needed. (https://docs.microsoft.com/en-us/azure/active-directory/develop/howto-create-service-principal-portal)
Setup:
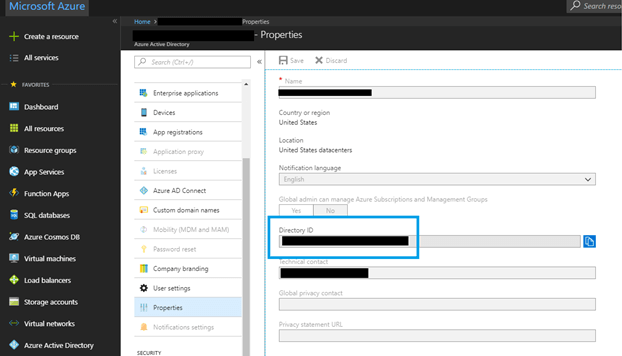
1. Directory ID
The first piece of information you need to gather is the “Directory ID” or “Tennant ID”. Various pieces of documentation refer to these interchangeably, but for the purpose of this guide, we will refer to it as the Directory ID. The Directory ID is a GUID located in the properties section of your Azure Active Directory setup.
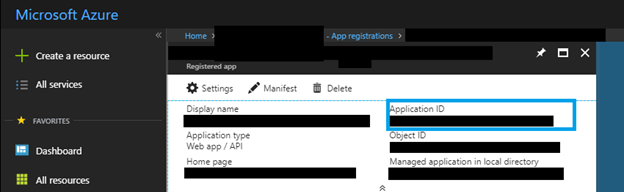
2. Application ID
The next step is to gather the Application ID from the App Registration. The Application ID is a GUID located on the app registration for your app. Azure Active Directory App Registrations are located under Azure Active Directory -> App Registrations.
3. Azure Key Vault
The next step is to create an Azure Key Vault. This guide presumes this has been set up, and you’ve added a “secret”. In order to set up an Azure Key Vault, the following documentation can assist you. (https://docs.microsoft.com/en-us/azure-stack/user/azure-stack-key-vault-manage-portal) In addition, it can be done programmatically. (https://docs.microsoft.com/en-us/azure/key-vault/quick-create-node#deploy-the-node-app-to-azure-and-retrieve-the-secret-value).
4. Access Policy
The next step is to set up an access policy that allows your Active Directory App to access its values. On the access policies page, add a new policy. Under “Select principle” enter your “Application ID” into the search. This should bring up your active directory application. Select the app, then hit the select button.
Once you’ve selected the principle, you’ll have to configure the access settings. This demo uses the “secret list” and “secret get” permissions. Once you’ve selected your permission and hit OK, you’ll be back at the access policies for your key vault. Please note you need to hit save on this page, simply creating the policy doesn’t save it.
5. DNS Name
The last piece of information you’ll need to gather is the DNS Name for the key vault URL. This can be gathered from the properties page of the key vault instance.
Additionally, this demo uses the key / secret authentication method, however there are other methods of authentication. At the time of writing I was unable to find documentation on setting them up properly at the time of writing this article with the given libraries. As such, if you’re using this form of authentication you’ll need a key / secret combination from the Azure Active Directory Application.
For Node:
1. Client Object
The first step is to create the client object. This presumes you’ve set up environment variables for the Azure Active Directory key and secret.
var keyVault = require('azure-keyvault');

let client = new keyVault.KeyVaultClient(new keyVault.KeyVaultCredentials((challenge, callback) =>
{

	return (new authenticationContext(challenge.authorization)).acquireTokenWithClientCredentials(challenge.resource, process.env.AD_CLIENT_KEY, process.env.AD_CLIENT_SECRET, (err, tokenResponse) =>
	{

		if (err)
		{

			// console.log('error getting authorization', err);

			callback(err);
		}

		else
		{

			callback(null, tokenResponse.tokenType + ' ' + tokenResponse.accessToken);
		}
	});
}));
Once this client object is created, you’ll use it to interact with the Key Vault. Below is an example of how to pull a secret.
2. Pull a Secret
There’s no (documented) way to pull the current version of a secret, which poses a problem for most use cases. As such, we iterate over the secrets until we find one that’s enabled, and hope the first one is the most relevant one. Once we have the secret version, the version ID is only sent in URL format, but we need the version number alone. As such, we have to split the ID and send that as the version ID.
let getSecret = function(secretName, callback)
{

	client.client.getSecretVersions(process.env.KV_URL, secretName, (err, res) =>
	{

		if (err)
		{

			callback(err);
		}

		else
		{

			let foundValidValue = false;

			for (let index in res)
			{

				let obj = res[index];

				if (obj && obj.attributes && obj.attributes.enabled)
				{
					// Only way to get id from returned id, which is in url format.
					let id_split = obj.id.split('/');

					this.client.getSecret(process.env.KV_URL, secretName, id_split[(id_split.length || 1) - 1], (err, res) =>
					{

						if (err)
						{

							callback(err);
						}

						else
						{

						callback(null, res['value']);
						}
					});

					foundValidValue = true;

					break;
				}
			}

			if (!foundValidValue)
			{

				callback(new Error('no valid value ' + JSON.stringify(secretName)));
			}
		}
	});
};
For Python, the example is similar:
First we create the client:
1. Callback
The first step is to create the callback function. This could also be accomplished with a lambda.
# Environment variable manager
from os import environ
from azure.keyvault import KeyVaultClient, KeyVaultAuthentication
from azure.common.credentials import ServicePrincipalCredentials

def auth_callback(server, resource, scope, *args):

	credentials = ServicePrincipalCredentials(client_id=environ.get('AD_CLIENT_KEY'), secret=environ.get('AD_CLIENT_SECRET'), tenant=environ.get('AD_TENANT_ID'), resource='https://vault.azure.net')

	return credentials.token['token_type'], credentials.token['access_token']
2. Create the Client
Then we create the client.
keyvault_client = KeyVaultClient(KeyVaultAuthentication(authorization_callback=auth_callback))3. Define the Creation Method
Once the keyvault client has been created, we define the creation method as the following:
def get_secret(var):

	res = ''

	for version in keyvault_client.get_secret_versions(environ.get('KV_URL'), var):

		if version and version.attributes and version.attributes.enabled:

			version_id_split = version.id.split('/')

			version_id = version_id_split[(len(version_id_split) if len(version_id_split) else 1) - 1]

			response = self.keyvault_client.get_secret(self.get_env_var('KV_URL'), var, version_id)

			self.secrets[var] = response.value

			res = response.value

			break

		else:
			# print(version.attributes, version.attributes.enabled)
			pass
	# else on loop in python triggers if loop was not broken
	else:

		raise EnvironmentError('unable to find env error', var, res)

	return res
This follows the same steps of iterating over versions and getting the text from the first valid result. This implementation is simpler due to the fact that it uses a synchronous workflow.
It may be worth considering caching the results in an object, assuming the Azure KeyVault doesn’t do this natively, but this could be a security concern.